

This week’s post is about another very common issue within gymnastics, flat feet (or in medical terms pes planus). This topic is extremely important and frequently seen in both coaches and athletes. As I will explain, having flat feet (along with some other factors) may not only create foot/ankle dysfunction but also possibly increases the risk for other serious lower leg injuries. Having flat feet is often considered to be one piece of the puzzle for traumatic ACL tears, plantar fasciitis/inflammation of the plantar fascia, Achilles tendonopathy/calf pain and injury, Sever’s disease, and progressive knee/hip/lower back problems. When looking from the back, gymnasts with aquired flat feet often show a certain heel/foot alignment known as a “rearfoor valgus”, like this picture (her left foot is a little worse than her right). Notice how the insides of her feet appear to lean in as she stands normally.

Excessive Flat Feet/Over Pronation Causing Rear Foot Valgus
Gymnast’s typically show more prevalence of flat feet than other athletes due to being barefoot at all times when practicing or competing. On top of this (no pun intended), gymnast’s feet are subject to excessively high forces from constant jumping, landing, tumbling, vaulting, and dismounting. I read in a recent clinical research commentary from a group of sports physicians that tumbling on floor can produce forces ranging from 5 – 17.5 times an athletes body weight. That blew me away, that means upwards of 1700lbs – 2000lb’s of force for your older aged athletes. By random comparison, an average baseball player strikes a ball with a bat at close to that force range. Yikes. That certainly got me thinking about the importance of proper tumbling mechanics and a link to injury. It is probable that vaulting is similar to this amount of force, and dismounting is up there as well. The above picture of the foot caving inwards gets amplified when the gymnast has forces stacked on top from tumbling, vaulting, dismounts, and landing on one leg for leaps/jumps,, etc.
All of that force has to go somewhere, and that is usually how injuries start to creep up. I took time to record slow motion video of some of my gymnasts doing leaps on beam and tumbling. When I broke it down you could see many athletes hitting the beam/floor with a toe pointed position first, then once they reached the end of their available ankle motion (usually dorsiflexion is limited due to tight plantar flexors), they have a huge and rapid arch drop into the flat foot position. It’s hard to see in this photo, but this series of issues I outlined happen here

Flat foot and faulty lower leg train seen with switch leap landing on beam
As I will explain below, this transition of force and improper movement pattern is not only taxing on the foot, but can also lead to a lot of problems up the road above the foot itself. There is other research that looks into how the position of the heel and foot increase strain on the Achilles tendon. Through tissue loading models they suggest that the more the foot becomes flat (pronated and calcaneus everted), the more asymmetrical strain on the Achilles tendon. This means simply that the inside of the achilles tendon takes more pressure with a flat foot, in some studies suggesting almost double the forces with each landing. You can see in the above picture that her flat foot also sets up a position for her knee to be caving in towards the middle, which is dangerous as well.
Coaches demonstrate similar issues related to flat feet due to the extended period of time they spend on their feet for job requirements. Being on your feet for long hours, spotting, and being active all can possibly create a collapse in the arch. This can then lead to problems related to connective tissue inflammation and soreness on the bottom of the foot.
Personally, I feel that it has become so frequent in our athletes that many people tend to wrongly overlook it as not being an issue. I believe that by learning about how flat feet and other faulty biomechanics may contribute to injury, members of the sport will better understand the reasons awareness is needed. There is some really cool new information in the PT world done by Thomas Myers that explains how muscles and connective tissues connect in patterns/chains and can link to common issues. In one of the chapters of his book Anatomy Trains, he describes a chain known as the Spiral Line. Without getting to in depth, he outlines how flat feet or over pronation can be linked through other muscular connections the pull on some structures of the front/side of the thigh, then possibly contributing to the pelvis to tilt forward (anterior pelvic tilt). When I was reading through this part of the book it certainly peaked my interest, because flat feet, restricted tissue mobility of the front/side of the thighs, and anterior pelvic tilting are some of the most common connections that can be made in gymnasts with some common overuse injuries and pain.
There are some great ways to stay ahead of foot problems and possibly prevent both progressive and traumatic injuries within the sport. As I did with the post on hip flexors, I will briefly go over some anatomy for a basic understanding. Then, I will explain why it is so important to realize why flat feet contributes to other injuries. Lastly, I will suggest a few techniques/exercises to help deal with someone who is battling flat feet and may/may not have pain.
Anatomy
I will just give the basics for this area, because it is super complex. There are actually a few arches of the foot, however the most notable and what usually gets the most attention is the Medial Longitudinal Arch. This arch is along the inside of the foot and is supported by bones, ligaments, connective tissues, and muscles. The two main functions of this area are for weight bearing/shock absorption and propulsion (pushing off).
A Few Important Ligaments/Connective Tissues that Assist Arch Include: Long and Short Plantar Ligaments, the Spring Ligament, and the Plantar Aponeurosis/Plantar Fascia. There are just a few, but collectively they are all ligaments and connective tissue structures that help hold the arch up and absorb impact.

A Few Important Muscles of the Arch Include: Posterior Tibialis (pulls foot down and in), Peroneus Longus (pulls foot down and out), Flexor Hallicus Longus (bends big toe), and Flexor Digitorum Brevis (bends other toes). Again, there are tons of small and large muscles effecting the foot. Not to mention fascial sheaths, other ligaments/tendons, and bony structures obviously. The important idea to know is that these muscles and structures work together to increase the tension in the arch, control forces through the foot, and help with shock absorption/push off.

Foot Muscle Snapshot

Posterior Tibialis
Now believe me I know, not too riveting for most people. However, many people are visual learners and I think at least seeing where/how they effect the foot helps. The important idea to take away about the anatomy when reading on is:
- The arch is supported by many structures, some you can’t really change (bone stucture) but some you can alter (muscles and connective tissue/fascia) through certain techniques. Muscles can be strengthened/stretched and connective tissue can be manipulated with myofascial release to reduce tension.
- Excessive jumping, landing, and time on your feet stretches the ligaments/fascia/connective tissue contributing to a dropping of the arch. The same activities over elongate the muscles and make them weak, contributing to a dropped arch. Overtime this can lead to micro tears and inflammation of the foot/heel, and soreness in muscles that maintain the arch.
- Strengthening of the arch, proper body mechanics, and some pre-hab techniques can promote increased ability to absorb shock and possibly reduce injury/pain. Myofascial release can help to combat scar tissue and reduce the increased tension from overuse.
Why Should I Care?
Cue the “So what if my gymnasts have a little duck foot thing going on”. I know you may be thinking that it really isn’t a big deal. However, I hope to point you in the other direction. The Physical Therapy and Medical Rehab/Biomechanics world has made a lot of strides (again no pun intended) to raising awareness about this issue. Based on evidence and some current literature, here are a few reasons flat feet and faulty lower body biomechanics are concerning.
- ACL Tears: This is by far one of the biggest reasons to pay attention to flat feet. Many studies have suggested that flat feet (also referred to as excessive pronation) may one risk factor that is connected to an increased risk of ACL tears within the general population. This risk is outlined to be significantly higher in the younger female athletic population (most female gymnast fall in this category). Improper landing techniques, unequal leg weight distribution, specific hip and core weaknesses, poor dynamic stabilization of the leg, and landing with knees caving in/ flat feet are just a few proposed risk factor that puts someone in the position to suffer an ACL injury. Below is a picture of the improper positioning commonly seen that leads to issues. Below it is the translation for what the medical terms mean.

Proposed ACL Tear Risk Factors – http://www.howardluksmd.com/public/ACL-Injury-Prevention-Risk-Factors2.jpg?cda6c1
- Femoral Adduction = upper leg moving to the middle of body
- Dynamic Valgus/Knee Abduction = knees move closer together or look like “knock knees” as the knee bends
- Ankle Eversion = ankle mives outward and shows a foot flat position
The position of the right leg in this picture puts the ACL under some serious tension. Many people in the rehabilitation and medical field are making it a point to raise awareness about all of these factors, due to the alarmingly high rate of ACL tears in young athletic female populations.
Here is a frame by frame from a video I took of a much less severe case, but what you might see in your athletes. These two athletes simply did a stretch jump. Look at the athlete’s right leg on the left side of the picture (in pink), compared to the athlete on the right (blue) as they both land.

Pre Take Off

Take Off

Downward Flight/Pre Landing

Initial Landing – (Look at right knee to midline/valgus and flat foot)

Shock Absorption (Look at even more right knee rotation, knee to midline, and flat foot)

Finishing Phase – Athlete corrects and resumes better alignment
The improper position is best seen in the second to last photo. Researchers have analyzed thousands of athletes in person and on film, and see this quite often. Many sports that involve running, jumping, and quick lower body movements are the focus for these studies (soccer, volleyball, football, gymnastics). You can imagine how much stress would be put onto the right knee of this athlete if this happened when landing a vault, dismount, or big tumbling pass. This concept also has a relation of faulty biomechanics also has a link to why many athletes suffer from knee pain, but I will save that topic for another post.
It is crucial to educate athletes about how knee position/flat feet/proper biomechanics is dangerous so they are consciously thinking about it. An ACL rupture often comes with many other problems (MCL and meniscus damage) and is a devastating injury that no one ever wants to hear/see/have happen to them.
Plantar Fasciitis/Foot Pain:
- As seen above with the anatomy, flat feet can lead to excessive stretching of the plantar fascia and foot musculature. With excessive landing and jumping forces from gymnastics, athletes may experience small microtears and foot/heal pain. Plantar fasciitis literally means “inflammation of the plantar fascia” and is a tough beast for someone to live with once it sneaks up on you.

Regular Arch vs Flat Foot/Pes Planus Reference
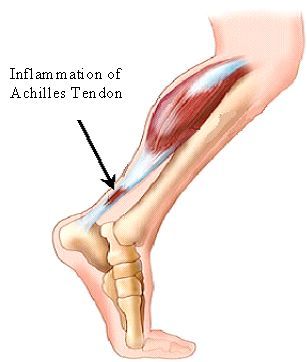
Achilles Tendonitis/Tendonosis/Possible Tear:
- Other literature and research focuses on how having flat feet my cause Achilles pain. These authors suggest that with an excessively low arch the Achilles and calf muscles get over abused. This over abuse can lead to a gradual injury like Achilles tendonitis. Literature also suggests that the tissue structure actually changes to have more scar tissue and “bad” nerves that cause pain. Overtime the tendon becomes less strong, which might possible lead to a tendon tear when under stress. With gymnastics having tumbling, vaulting, dismounts, etc…athlete’s Achilles are certainly getting plenty of work put on them.
- Sever’s Disease is another big issue to be aware of that occurs in a lot of gymnasts. Sever’s Disease is an iritation of the growth plate in the heel, and can become very problematic/painful for gymnasts due to the amount of tumbling and landing stress that goes into the heel. It is very frusterating for the gymnast to deal with once it comes about, and ususally takes some rest and proper rehab for healing time

Achilles Tendonitis Reference
Increased Pressure:
- Having decreased arch height reduces the amount of shock your foot can absorb. As I noted above, these forces are amazingly high in gymnastics. All of the pressure has to get distributed somewhere, and typically this is how other joints get involved as they attempt to take the weight. There are a variety of areas that can take the excess loading, and each person’s problem may manifest a different way based on their own biomechanics. Muscular strains, overuse injuries, bone bruises within the foot, knee pain, hip pain, and lower back pain all are possibilities. None of which you want to deal with.
S.O.S – Save Our Soles (hah!)
So, with all of this in mind here are some ways to combat having flat feet regardless if someone does/does not have pain. They can be easily added in a warm up, during an event, during cool down, or at home. Many times the arches get flat because of overuse, scar tissue build up, weak musculature, and improper biomechanics. By attempting to reduce scar tissue and tightness in the lower leg, strengthening the appropriate musculature, and being aware of proper mechanics, the possibility of injury/pain may be reduced. These can be used in conjunction with the commonly used Achilles/calf stretches athlete perform during a warm up.
Stretching/Myofascial Release of Arch and Plantar Fascia
- Using a golf ball, have the step on the golf ball. Have the athlete lean some weight onto the ball then massage up and down the sole of the foot, between the balls of the feet, and at the back of the heel. This will help to break up unwanted scar tissue that accumulates from repetitive overuse.

Myofascial Release Using Golf Ball
- Foam Rolling for Gastrocnemius/Soleus (Calf Muscles) and musculotendinous junction (where calf muscle becomes achilles tendon). This is a great way to release tension in the calves which can be pulling excessively on the Achilles and tissue of the foot. Many times problems arise in the musculotendinous junction, which is typically 3-5″ above the heel. Have the athlete cross one leg over the other, and push up and down with arms while pressing down on their calves. Be sure to rotate the toes in and out to get the entire width/length of the muscles.

- Plantar Fascia/Arch Stretch: First put pressure on the bottom of the foot moving the foot towards the head. Then, also apply pressure to the bottom of the toes until they extend as well. This will put tension on the arch of the foot and allow a stretch for the arch of the foot and calf. This can also be done individually by extending the toes against the front of a stair/wall, then leaning towards the stair/wall with an extended leg.

- Calf Stretches: One of the biggest things gymnasts can do it to keep their calf muscles lengthened and stretched along with doing the myofascial work in the gym. Gymnasts very commonly develop strong and overshortened plantar flexor muscles from the amount of time spent in toe point for skills. By using a beam base, the gymnast can simply stretch the two joint calf muscles, known as the gastrocnemius, and also the one joint calf muscle, known as the soleus. This can be done easily at the end of the beam while waiting for a turn.

Gastrocnemius Stretch Using Beam Base

Soleus Stretch Using Beam Base
- Myofascial Release/Icing Combo Bottom of Foot for Foot and Heel Pain: After you have stretched out the fascia/muscles you can also use an ice bottle to assist with pain relief. This is really good to come home and do after practice. Fill a water bottle up 3/4 with water and throw it in the freezer before practice. Then, using the same technique as the golf ball you can massage the bottom of the foot. Caution with bare feet, it gets rather chilly. Wearing socks can help to reduce the discomfort.

Myofascial Release/Icing Using Water Bottle
Strengthening To Increase Arch Height
Here are some exercises to help increase arch height and reduce flat feet. They mostly target the small and larger muscles that support holding an arch. By increasing their strength, you can possibly increase arch height and allow for better shock absorption. By the far the most important concept to think about is actively engaging the foot muscles. With the foot down, the gymnast should think about trying to pull the big to and the heel closer to each other. This is hard to actually do with the foot on the ground, but if they gymnast is doing it correctly you will be able to see the foot arch come up a bit, and they should feel the tightening along the inside/bottom of their foot. You will also be able to feel the tension in the arch if you put your finger on the inside arch of the foot. Activating this type of tension will help throughout all of the drills and skill work the gymnast does.
- Arch drops: This exercise helps to strengthen muscles running along the arch of the foot. Stand with the inside of your foot half off a step or stair. First start with the inside of the foot raised with most of your weight on the outside of the foot. Then, drop the inside of the foot below the level of the step, and return to starting position. It can be awkward to try, but make sure only the foot (not the knee, hip, or trunk) are moving to compensate. Perform 2-3 sets of for each foot, you should feel this working in the bottom of your foot.

Starting Position for Arch Drops

Low Point for Arch Drops
Finishing Position for Arch Drops
- Theraband/Elastic Exercise to increase arch height. This exercise uses a theraband position to strengthen the posterior tibialis muscle, which runs the length of the arch and assists in shock absorption. Have the athlete cross one leg over the other, and attach the looped end to the foot underneath. Starting position is with the foot “up and out”. Then the athlete pushes “down and in” towards the inside of their foot. Perform 3 sets of 8-10 with an appropriate resistance to feel the muscle along the inside of the foot working. The right foot is performing the exercise in these pictures.

Right Foot Posterior Tibialis Exercise to Strengthen Arch: Starting Position

Right Foot Posterior Tibialis Exercise to Strengthen Arch: Ending Position
- Marble Pick Ups: I didn’t have a bowl of marbles laying around at the gym for pictures but, the concept is pretty simple. Lay out a bucket of small marbles on a towel with a bowl beside it. Then, using the toes and feet transfer the marbles one by one to the bucket. This helps to strengthen the small muscles of the foot/arch, and is suprisingly frustrating. Using a variety of sized and textures will up the challenge. It is something easy that can be done while the athlete is hanging out on the couch at home. Here is a YouTube link to a demonstration: http://www.youtube.com/watch?v=UUsDzfd0oWc
Inside Foot Biased Toe Raise Work: Another really good to strengthen the inside arches of gymnasts is to do some toe point and beam work focusing on the inside portion of the foot. My boss and I noticed that many of the girls were compensating in their beam work by using the outer portion of their feet during their beam work, and weren’t really getting to the inside arch. I’m sure many great beam coaches harp on this out there, but we found this drill succesful to help with arch support and make the girls aware of it. The gymnast will stand with the outside of their foot hanging off the beam, getting support from another person or some stable object. By only pressing through the first two toes and inside foot, they will push up on toe and hold, then lower. It’s a simple exercise I’m sure many people do already, but it is a great way to isolate the arch and cue the gymnast into the problem they are working on.
***Please keep in mind that I noted above how very tight calves can be part of the issue for this area. Due to this, it many not be the best idea to hammer away on 100 of these on each leg and further contribute to calf tightness. Doing a few of these as adjunctive work to beam skills for technique will do the trick, just thought that was importance to note.

Medial Arch/Inside Foot Biased Toe Raise – Side Start

Medial Arch/Inside Foot Biased Toe Raise – Side End

Medial Arch/Inside Foot Biased Toe Raise – Back Start

Medial Arch/Inside Foot Biased Toe Raise – Back End
Dynamic Balance “Y” Cone Drill: This is another great drill to help build up proprioception and balance in the entire lower leg, especially the foot/ankle complex. It can also serve to build up the ankle and foot musculature to aide in shock absorption. The athlete stands in the middle of the cones on one leg, and without excessively moving the trunk the athlete attempts to touch the cone in front, to the side, and to the other side of them with out loosing their balance. The girls love this drill and find it quite challenging when done correctly. Be sure to make sure the athlete has good hip, knee, and angle alignment and they aren’t falling into the patterns noted above in the scary ACL risk factors reference. 

Star Excursion Balance Drill Front – Step 1

Star Excursion Balance Drill Side – Step 2

Star Excursion Balance Drill Inward – Step 3
Springboard Arch Support Drill – Another great drill for combating overly flat feet and training arch support muscles uses a slanted tilt board, or mat. I found this drill credit to Chris Johnson, a very well known PT who specializes in running and tri-athelte care. The gymnast will stand sideways with the inside of their foot towards the end of the springboard, then move into a single leg hold position. Assuming this position and doing single leg balance drills causes areas like the intrinsic foot muscles and posterior tibialis to fire to prevent falling over. It is very important that the gymnasts actively think about holding a strong arch to not pinch on some of the tissues on the outside of the leg. Building up these muscles then helps to get stronger arch support, and aid in shock absorption. I’ll also include the youtube link from his website where he does this with a balance board (http://www.youtube.com/watch?v=QgEZCU2S-qM)
Use of Orthotics/Proper Shoes Outside of Practice
One of the best tools a gymnast has to combat flat feet is to make sure that when they are not practicing, the arch of the foot is being supported for proper foot mechanics. Taking the time to invest in proper foot orthotics that support the athlete’s foot during every day activities will help combat the high forces during practice that force the foot into being flat. Many times a proper foot orthotic in combination with a proper support shoe will help with the arch problem, but remember that some over the counter orthotics won’t hold up against running and impact activities. Athlete’s who wear flip flops or non supported shoes out of practice may be fashionable but not necessary helpful to combat flat feet. I would encourage athletes to seek the advice of a trained professional who can help recommend specific orthotics and proper footwear for each person as needed. Below are some taping techniques to support the arch during practice and competition. Between using arch supports and sturdy shoes outside of the gym, taping and exercises inside the gym, and being aware of the problem gymnasts may find they get significant relief with their flat feet problems and associated pain.
Taping or Arch Support During Practice: A huge way gymnasts can stay ahead of problems or halt the progression of issues is to find some way to support the arch during practice. By allowing some arch support it reduces the amount of pressure through the foot and in turn can help to combat the forces flattening the arch over time. Dr. Josh Eldridge has made one great tool called the “X” Brace that helps to provide support during practice, which can be found here
http://gymnastcare.com/thexbrace
http://www.thexbrace.com/severs-disease-cant-stop-this-gymnast/
There are also some ways to tape a gymnasts foot with both regular tape (provides mechanical support), and KT tape (helps facilitate muscular activation and sensory input), that can help.
Using KT/Kenisio/Rock Tape To Help Foot Proprioception and Assist Foot Muscles
If your a little more skilled with tape and want to try this technique, it may be helpful for some athletes who have flat feet or pain in their arches. Remember that if an athlete has active pain, activity/practice modification and rehabilitation is your best tool. I would suggest altering tumbling/landing surfaces in the short term, along with reducing the amount of impact the athlete is exposed to. The injury will never have time to recover if there is no rest, and the injury will always come back if you don’t fix the biomechanical problem that is the underlying cause.
Remember that all of the forms of kenisio/KT/Rock tape all don’t add much support to the foot and arch. Their theoretical purpose is to help muscles of the foot give good feedback information to the brain about the muscles/joints, and also possibly assist with other localized tissue effects.
If you wish to get true support of the arch, regular athletic tape must be used that will restrict movement or effect the gymnasts biomechanics. Many times I will opt to use this technique along with other techniques such as the “low dye” tape or “reverse 6” taping with more sturdy athletic tape. That type of taping can get pretty tricky and takes a more specialized knowledge of the foot, so I chose not to include it here. However, if you are a medical professional who is familiar with taping and want’s to see how it can be used for gymnasts you treat, here is a link to a youtube video
http://www.youtube.com/watch?v=DPzV60fv2Ts
I will include a step by step process , pictures, and link to a video for reference for the elastic tape. There are many taping techniques, this is just one simple version I have found helpful with some athletes.
- 1) Have the athlete sit, extend their leg, bring their foot and toes towards their head. Peel backing off one end and apply first strip to the balls of the foot with no tension.

Step 1
- 2) Then, pull the length of the bottom of the foot with 50% stretch (stretch far then back off 1/2 way to estimate tension) and secure to heel using thumb.


- 3) Holding your thumb on the heel, wrap the rest of the tape up the back of the calf with no tension

- Rub the tape and secure ends for heat activated component of this strip of tape
- 4) Take another piece, and secure it to the inside of the foot about 6″ above the prominent bone on the inside of the ankle with no tension. Hold the second piece just below the same bone with no tension, then hold it in place with your thumb.

- 5) Give the tape a fair amount of stretch (about 80%) as you wrap under the foot over the arch. Then, hold down the last bit of tape with your thumb and secure it to the outside of the foot with no stretch.

- 6) Rub the tape and secure ends for heat activated component of this strip tape


Left Foot (Not Taped) with Flat Arch Noted

Right Foot (Taped) with Less Flat Arch Noted
After a few runs it gets relatively easy to do. You can also use regular athletic tape at the very end to secure down the pieces of KT/Kenisio/Rock Tape so it does not fall off through practice. Again remember the elastic tape does not actually add support to the foot, the best way to do this through stiffer athletic tape that requires a better working knowledge of the foot. If this seems to reduce the athletes pain or helps with biomechanics of an increased arch, the athlete may be suitable for orthotics. It may be helpful to utilize the orthotics whenever the athlete is not in practice to help maintain the arch integrity. This process can be handled with over the counter orthotics that have some support through the arch, but many times its best to seek advice about the best sizing/fit from a healthcare professional. A related side note, flip flops also are a large contributing factor to dropped arches in people due to the lack of support and stability. Just food for thought. Here is the link from the KT website where a Physical Therapist explains the arch taping pretty well :
http://www.youtube.com/watch?v=WTSOQg680mc
Conclusions
So although the information may seem a bit intense, I hope that readers find it helpful and have a better understanding why recognizing flat feet is important. This is by no means an exhaustive list of the ways to help flat feel, foot pain, or to deal with injuries. A gymnast who has flat feet is just one component of dealing with the issues that come up. However, I believe that this information has a place in every coach and gymnast’s training program. Understanding the basic biomechanics of flat feet, what to look for, what link it has to potential injury, and how to help someone is great knowledge for all members of the sport. There is much more information about more individualized ways to deal with certain conditions. In the future, I hope to dial in on some of the more specific topics.
Along with practice some of these techniques, you have to be aware of how your athletes are jumping and landing. Encourage athletes to not let their knees “knock” together, use the buttocks and quads to absorb landings, and never sacrifice proper technique. There is a lot more to come in this area in the future. In the next couple weeks I am hoping to collaborate with a good friend of mine Joe Myhren for a closely related topic of proper jumping/landing techniques. Joe and I graduated from the same DPT class, and he also has a certification in strength and conditioning. He is spending time doing Physical Therapy Sports Residency and has a huge background in jumping, landing, and knee injury prevention. For now, I hope that this read was useful and your knowledge on the topic has grown. Best of luck,
Dave
P.S. I added two new exercises to the Shoulder Preventative Rehabilitation Post from last week, check em out!
References:
- Hewett, et al. Understanding and Preventing ACL Injuries: Current Biomechanical and Epidemiological Considerations – Update 2010. NAJSPT. Dec 2010: 5 (4); 234 – 251
- Bradshaw E.J., Hume P.A. Biomechanical approaches to identify and quantify injury mechanisms and risk factors in women’s artistic gymnastics. Sports Biomechanics. 2012; 11(3) 324 – 341
- Irwin G., Gittoes MJR. Biomechanical approaches to understanding the potentially injurious demands of gymnastic-style impact landings. Sports Medicine, Arthroscopy, Rehabilitation, Therapy & Technology. 2012 4(4)
- Lorenz, D., Reiman, M. The Role and Implementation of Eccentric Training In Athletic Rehabilitation: Tendinopathy, Hamstring Strains, and ACL Reconstructions. NAJSPT. March 2011: 6 (1); 27 – 44
- Cook G., et al. Movement – Functional Movement Systems: Screening, Assessment, Corrective Strategies. First Edition. On Target Publications, 2010.
- Myers, TW. Anatomy Trains: Mysofascial Meridians for Manual and Movement Therapists. Second Edition. 2009
- Oscar E. Corrective Exercise Solutions to Common Hip and Shoulder Dysfunction. Lotus Publishing: California; 2012
- Page P., Frank C.C., Lardner R.. Assessment and Treatment of Muscle Imbalances: The Janda Approach. Sheridan Books; 2010
- Wertz, et al. Achilles Tendon Rupture: Risk Assessment for Aerial and Ground Athletes. Sports Health: A Multidisciplinary Approach. Sept/Oct 2013; 5 (5): 407 – 416
- Peak Performance: The Research Newsletter on Stamina, Strength and Fitness. Achilles Tendonitis: Prevention & Treatment. 2004; Peak Performance Publishing, Goswell Road, London.
- Magee D. Orthopedic Physical Assessment. Fifth Edit. St. Louis: Saunders Elsevier; 2008.
- Knee Biomechanics Picture Reference: http://www.howardluksmd.com/public/ACL-Injury-Prevention-Risk-Factors2.jpg?cda6c1
- Flat Foot Arch – Lateral View Reference: http://athletewithstent.com/wp-content/uploads/2013/09/flat-foot-arch1.jpg
- Achilles Tendonitis Reference http://4.bp.blogspot.com/-jo-S9fxyZGQ/TrE1LCN_bII/AAAAAAAAJWk/k9WBpXiBNDI/s1600/achillies-tendon2.jpg
- Posterior Tibialis Picture Reference: http://www.protraineronline.dreamhosters.com/wp-content/uploads/2011/07/leg.jpg
- Foor Muscles Picture Reference: http://www.google.com/imgres?imgurl=http://www.eorthopod.com/sites/default/files/images/foot_anatomy_muscles01.jpg&imgrefurl=http://www.eorthopod.com/content/foot-anatomy&h=400&w=398&sz=130&tbnid=Hw7UaogJv0_9IM:&tbnh=90&tbnw=90&zoom=1&usg=__NyKpzvSZ_l4FXqmh_TDhjLU4mWM=&docid=rkByPFmjdy7z8M&sa=X&ei=p1w6UsKGCfSw4AO-6oH4BQ&ved=0CDwQ9QEwBA&dur=946


")


")


Saved as a favorite, I love your blog!